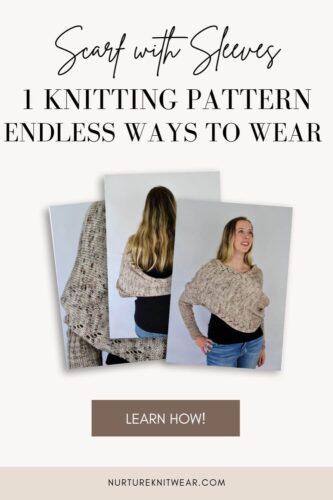
Overwild is a new free easy lace scarf knitting pattern with sleeves that is sized like a sweater so that you can get the perfect fit for your body. Pair this gorgeous lace scarf with sleeves with your favorite dress or top to transition from winter to spring in style!
What is a Lace Scarf Knitting Pattern With Sleeves?
It’s just like it sounds. It’s an easy scarf knitting pattern for beginners with a set of ribbed sleeves on each end. You put on a sleeve, wrap the scarf around your torso/neck 1.5 times, and then put on the other sleeve, and voila!
You’ve got a gorgeous wrap with sleeves that wards off the spring chill while allows wear your favorite summer top or dress!
The sleeves, of course, keep your arms warm, but they also act as an anchor so that you wrap/scarf are not dangling in the way of your every day tasks!
Thank you!
You have successfully joined our subscriber list.
Note: The yarn for this pattern was provided for me at no charge by the yarn company. Yarn support allows designers, like me, to continue to provide you with gorgeous patterns while we grow!
How Difficult Is This Easy Scarf Knitting Patterns For Beginners?
Not at all! Do you know how to knit and purl? How about work simple increases and decreases for the ribbed sleeves? If not, no worries! I’ll teach you through the detailed instructions in the easy lace scarf knitting pattern.
If you have these skills already, then you are golden!
Where Does The Lace Come In On This Lace Scarf Knitting Pattern?
See the simple, yet gorgeous edging on the wrap part of this easy lace scarf? That’s it! Yes, it’s really that simple (and that beautiful)!
If you can yarn over and decrease, then you can work this lace edging. And the rest is simple and relaxing stockinette. The Wild series is all about elevated basics that you can wear with everything!
Thank you!
You have successfully joined our subscriber list.
The Knitting Pattern Says It’s Part of the “Wild Series”, What Does That Mean?
Overwild, as well as all Wild series sweaters, has modification at its core. What flatters one woman may not flatter another.
So Overwild had all sorts of additional instructions to change sleeve and wrap lengths, to alter the width or add drape. While Overwild may appear to be a basic sweater wrap in neutral colors (the kind perfect for any capsule wardrobe) there’s nothing basic about this pattern.
Get the perfect width and length for you as well as excellent sleeve fit! Knit the pattern from cuff to cuff or knit both sleeves first and join at the end. The options are endless!
Glossary for the Free Scarf with Sleeves Knitting Pattern
BO – bind off (in pattern unless otherwise specified)
CO – cast on
inc’d – increased
k – knit
k2tog – knit 2 sts together
m – marker
M1L – make one left – Insert the left needle from front to back into the horizontal bar between your last worked stitch and the next stitch to be worked. Knit the back leg of the loop (which twists the bar to the left).
M1LP – make one purl left – Insert the left needle from front to back into the horizontal bar between your last worked stitch and the next stitch to be worked. Purl the back leg of the loop (which twists the bar to the left).
M1R – make one right – Insert the left needle from back to front into the horizontal bar between your last worked stitch and the next stitch to be worked. Knit the front leg of
the loop (which twists the bar to the right).
M1RP – make one right – Insert the left needle from back to front into the horizontal bar between your last worked stitch and the next stitch to be worked. Purl the front leg of the loop (which twists the bar to the right).
p – purl
pm – place marker
rep – repeat
rm – remove marker
RS – right side or the side that will be seen when wearing
sl – slip stitch purlwise with yarn in back
sm – slip marker
ssk – one at a time, slip the next 2 sts knitwise; return the sts to the lefthand needles, and knit them together through the back loops
WS – wrong side or the side that will not be seen when wearing
Get the Perfect Fit for Your Sweater Scarf with Sleeves
How to Determine Fit: Length = Cuff to Cuff + 1/2 Bust Circ.
Overwild is worked cuff to cuff—alternatively, you can make 2 of sleeve one and use the Kitchener Stitch to graft the second sleeve to the end of the wrap. I chose to do it this way because I could get a sense of exactly how the wrap would fit.
Your free pattern is on its way!
In the meantime, join in the conversation at Nurtured Knitters, our Facebook group! Ask questions, share photos, and join a community made to lift you up!
Overwild: The Free Knitting Pattern
Sleeve 1
Using smaller needles, CO 48 (48, 52, 56, 60) [64, 68, 72, 76] sts using a loose Long-Tail CO or preferred stretchy CO. Pm and join in the round, taking care not to twist the stitches.
Rnd 1: K1, * p2, k2, rep from * to last 3 sts, p2, k1.
Rnd 1 establishes “ribbing” pattern. Continue to work the ribbing throughout the sleeves, even when working the increases maintain the ribbing pattern by knitting the knit stitches and purling the purl stitches.
Work ribbing for 1.5 (1.5, 1.5, 1.75, 1) [1, 1, 1.25, 1.25]”/4 (4, 4, 2.5, 2.5) [2.5, 2.5, 3, 3] cm.
Inc Rnd 1: K1, M1L, work ribbing to last st, M1R, k1 – 2 sts inc’d.
Work ribbing for 1.5 (1.5, 1.5, 1.75, 1) [1, 1, 1.25, 1.25]”/4 (4, 4, 2.5, 2.5) [2.5, 2.5, 3, 3] cm.
Inc Rnd 2: K1, M1L, work ribbing to last st, M1R, k1 – 2 sts inc’d.
Work ribbing for 1.5 (1.5, 1.5, 1.75, 1) [1, 1, 1.25, 1.25]”/4 (4, 4, 2.5, 2.5) [2.5, 2.5, 3, 3] cm.
Inc Rnd 3: K1, M1LP, work ribbing to last st, M1RP, k1 – 2 sts inc’d.
Work ribbing for 1.5 (1.5, 1.5, 1.75, 1) [1, 1, 1.25, 1.25]”/4 (4, 4, 2.5, 2.5) [2.5, 2.5, 3, 3] cm.
Inc Rnd 4: K1, M1LP, work ribbing to last st, M1RP, k1 – 2 sts inc’d.
Rep Inc Rnds 1-4 (and the ribbing between) 1 (1, 1, 2, 2) [2, 2, 2, 2] more time(s) – 64 (64, 68, 72, 84) [88, 92, 96, 100] sts. Continue to work ribbing in the round until sleeve reaches 12.25 (12.5, 12.5, 13, 13) [13.25, 13.25, 13.75, 13.75]”/31 (32, 32, 33, 33) [33.5, 33.5, 35, 35] cm.
Sleeve Fit: Sleeve should come 2-3”/5-7.5 cm above the elbow, so it feels secure with a bent elbow.
Wrap Set Up
Switch to larger needles. You’ll now begin working flat.
Row 1 (RS): K2, * p1, k1, rep from * 2 more times, pm, k to 8 sts before end, pm, * k1, p1, rep from * 2 more times, k2.
Row 2 (WS): Sl1, * p1, k1, rep from * 2 more times, p1, sm, p to m, sm, p1, * k1, p1, rep from * 2 more times, k1 sl1.
Row 1 (RS): K2, * p1, k1, rep from * 2 more times, sm, yo, * k22 (7, 12, 13, -) [-, -, -, -], M1L, rep from * 1 (5, 3, 3, -) [-, -, -, -] more time, k to m, yo, sm * k1, p1, rep from * 2 more times, k2 – 68 (72, 74, 78, -) [-, -, -, -] sts.
Rows 2, 4, 6, & 8 (WS): Sl1, * p1, k1, rep from * 2 more times, p1, sm, p to m, sm, p1, * k1, p1, rep from * 2 more times, sl1.
Row 3: K2, * p1, k1, rep from * 2 more times, sm, k1, yo, k to 1 st before m, yo, k1, sm, * k1, p1, rep from * 2 more times, k2 – 70 (74, 76, 80, -) [-, -, -, -] sts.
Row 5: K2, * p1, k1, rep from * 2 more times, sm, k2, yo, k to 2 sts before m, yo, k2, sm, * k1, p1, rep from * 2 more times, k2 – 72 (76, 78, 82, -) [-, -, -, -] sts.
Row 7: K2, * p1, k1, rep from * 2 more times, sm, k3, yo, k to 3 sts before m, yo, k3, sm, * k1, p1, rep from * 2 more times, k2 – 74 (78, 80, 84, -) [-, -, -, -] sts.
Wrap Repeat
All Sizes Resume.
Row 1 (RS): K2, * p1, k1, rep from * 2 more times, sm, yo, ssk, k to 2 sts before m, k2tog, yo, sm, * k1, p1, rep from * 2 more times, k2.
Row 2, 4, 6, 8, & 10: Sl1, * p1, k1, rep from * 2 more times, p1, sm, p to m, sm, p1, * k1, p1, rep from * 2 more times, sl1.
Row 3: K2, * p1, k1, rep from * 2 more times, sm, k1, yo, ssk, k to 3 sts before m, k2tog, yo, k1, sm, * k1, p1, rep from * 2 more times, k2.
Row 5: K2, * p1, k1, rep from * 2 more times, sm, k2, yo, ssk, k to 4 sts before m, k2tog, yo, k2, sm, * k1, p1, rep from * 2 more times, k2.
Row 7: K2, * p1, k1, rep from * 2 more times, sm, k3, yo, ssk, k to 5 sts before m, k2tog, yo, k3, sm, * k1, p1, rep from * 2 more times, k2.
Row 9: K2, * p1, k1, rep from * 2 more times, sm, k to m, sm, * k1, p1, rep from * 2 more times, k2.
Rep Rows 1-10 for 50.25 (55.75, 61.75, 68.75, 76) [81.5, 87.5, 94.5, 100.5]”/131 (145, 160, 178, 193) [207, 222.5, 240, 255.5] cm from the beginning of the wrap/top of Sleeve 1.
Stop to try it on! Put the sleeve on and wrap it around your shoulders one and a half times, pulling it to where the other sleeve will begin (Wrap Decrease section adds 1.25”/3 cm). Does it have enough drape for you? Too much? Adjust accordingly. Once it’s just right, continue!
In the meantime, join in the conversation at Nurtured Knitters, our Facebook group! Ask questions, share photos, and join a community made to lift you up!
Wrap Decrease
Sizes 1 (2, 3, 4, -) [-, -, -, -] ONLY
Row 1 (RS): K2, * p1, k1, rep from * 2 more times, sm, yo, sssk, k to 3 sts before m, k3tog, yo, sm * k1, p1, rep from * 2 more times, k2 – 72 (76, 78, 82, -) [-, -, -, -] sts.
Rows 2, 4, 6, & 8 (WS): Sl1, * p1, k1, rep from * 2 more times, p1, sm, p to m, sm, p1, * k1, p1, rep from * 2 more times, sl1.
Row 3: K2, * p1, k1, rep from * 2 more times, sm, k1, yo, sssk, k to 4 sts before m, k3tog, yo, k1, sm, * k1, p1, rep from * 2 more times, k2 – 70 (74, 76, 80, -) [-, -, -, -] sts.
Row 5: K2, * p1, k1, rep from * 2 more times, sm, k2, yo, sssk, k to 5 sts before m, k3tog, yo, k2, sm, * k1, p1, rep from * 2 more times, k2 – 68 (72, 74, 78, -) [-, -, -, -] sts.
Row 7: K2, * p1, k1, rep from * 2 more times, sm, k3, yo, sssk, * k12 (4, 7, 9, -) [-, -, -, -], k2tog, rep from * 1 (5, 3, 3, -) [-, -, -, -] more time, k to 6 sts before m, k3tog, yo, k3, sm, * k1, p1, rep from * 2 more times, k2 – 64 (64, 68, 72, -) [-, -, -, -] sts.
Sleeve 2
All Sizes Resume. Switch to smaller needles and join in the round.
Rnd 1: K1, * p2, k2, rep from * to last 3 sts, p2, k1.
Rnd 1 establishes “ribbing” pattern. Continue to work the ribbing throughout the sleeves, even when working the decreases maintain the ribbing pattern by knitting the knit stitches and purling the purl stitches. Work ribbing for 1.5 (1.5, 1.5, 1.75, 1) [1, 1, 1.25, 1.25]”/4 (4, 4, 2.5, 2.5) [2.5, 2.5, 3, 3] cm now and between all decrease rounds.
Dec Rnd: Ssk, work ribbing to last 2 sts, k2tog – 2 sts dec’d.
Rep Dec Rnd (and the ribbing between) 7 (7, 7, 7, 11) [11, 11, 11, 11] more time(s) – 48 (48, 52, 56, 60) [64, 68, 72, 76] sts. Continue to work ribbing in the round until sleeve reaches 12.25 (12.5, 12.5, 13, 13) [13.25, 13.25, 13.75, 13.75]”/31 (32, 32, 33, 33) [33.5, 33.5, 35, 35] cm from the beginning of the sleeve. BO all sts loosely.
Weave in all ends and block to measurements.
Wondering how to wear it? Check out this video on Nurture Knitwear’s YouTube channel!
Get the PDF!
Would you like an ad-free version of this pattern in a PDF format? I get you! You can get the beautifully styled (and super peaceful) PDF version on Ravelry or Etsy for just a few buck!
How to Style a Scarf With Sleeves
In the winter, toss the scarf with sleeves on over a long-sleeve top or even a sweater (that ribbing can take it!). Or transform a formal gown (or wedding dress) into cold-friendly formalwear without losing an inch of chic style.
In the spring & autumn, start with it on in the morning over a cute tee then roll it up and toss it in your bag until you need it again in late afternoon!
A scarf with sleeves is the perfect grab-and-go accessory for every formal and casual occasion! So grab your pattern and cast on for some relaxing, fun knitting!